Subscribe to receive top agriculture news
Be informed daily with these free e-newsletters

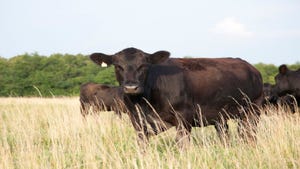
North Dakota Stockmen Association brand inspectors say botched brands now can cause problems in the auction ring next fall.
May 23, 2016
"Blotched brands don't do any of us any good," says Norbert Gangl, North Dakota Stockmen's Association brand inspector, Kist Livestock, Mandan, N.D. "If a brand isn't clear, it often leads to a hold at the auction market while inspectors track back the paperwork and make the proper identification needed to clear the animal. Taking your time while branding can help you avoid that situation."
NDSA brand inspectors say that to produce crisp, clean brand, do the following:

Strong hands and a hot iron are two keys to getting clear, crisp brands that will identify calves.
1) Enlist an experienced crew. Even the best brand can be ruined if the iron is applied incorrectly. Those with the most experience behind an iron should be the ones applying brands. There is plenty of work for those with less experience - roping, wrestling, holding, sorting or running cattle through the chute. A quick refresher course for helpers about the location and position of the brand before the project begins is always helpful.
2) Heat irons until they are wood-ash gray. Irons will turn this color when they are at the optimal temperature for branding hides.
3) Keep the hides dry. Branding irons work best on dry hides. If there is a possibility of rain on branding day, move the project inside if possible. If moving the project inside isn't practical, take precautionary measures, such as keeping the cattle inside before branding or moving cattle to a sheltered area for branding.
4) Clip the animal before branding when practical. Clipping the hair where the brand goes before applying the iron will help you yield a clear, crisp brand. Often producers don't have the time to clip the hide of a couple hundred calves prior to branding, but when it is practical, clipping the site of the brand is beneficial. Clipping eliminates an added layer the branding iron otherwise needs to burn through.
5) Apply the iron only until the hide is buckskin color. Less exposure will not burn deep enough. Longer exposure will cause the heat to erode the brand boundaries, blotch and blister. If you notice blisters on the animals immediately after you brand them, you are holding the iron to the hide too long.
6) If the animal moves before you are done branding, reapply the iron. Instead of holding the iron in place and smearing the brand, give the animal a moment to relax and try again.
7) Keep the iron clean. Irons can build up layers of charred hair and debris and compromise the crispness and cleanness of the brand's lines. Periodically cleaning the iron with a wire brush will help.
8) Use the appropriate size iron. There are no legal requirements dictating the size of branding irons you must use, but the NDSA generally recommends that, for older animals, characters are at least 4 inches in length and have a 3/8-inch face. For calves, a 3-inch-character iron should be adequate, unless it has many intersections and small spaces.
9) Keep hip brands up high. When you register a hip brand, you have the right to the whole hip. Avoid placing your brand low on the leg, where it is hard to read and is easily covered with mud and manure.
10) Select brands carefully. Because of their intersecting lines, brands containing B, R and 8 are most susceptible to botching because there is so much heat concentrated in a small area. What looks nice on paper may not look nice in practice.
Mistakes do happen. If your calf is mistakenly branded in the wrong location, the iron is turned incorrectly at application or you encounter another problem, call you state brand inspector, advises Stan Misek, NDSA state brand inspector.
In North Dakota, call (701) 223-2522.
In South Dakota, call (605) 773-3324 or (877)-574-0054.
For more information, visit www.ndstockmen.org or www.sdbrandboard.com.
Source: NDSA
You May Also Like
Enter a zip code to see the weather conditions for a different location.