Fall is a great time to take soil samples. Soil testing is the only way to determine soil nutrient levels, and the results of these tests can help make critical management decisions for the next growing season. This article discusses when to sample soil, different soil sampling methods, how to sample, what to test for, and where to send soil samples for analysis.
Soil testing starts with the soil sample. It’s critical to take a collection of representative cores for each soil sample. The small sample of soil collected serves as the basis for the lab analysis and ultimately will be used to interpret the soil test results and make recommendations. A handy resource to help with soil sampling is CROP3108, Take a Good Soil Sample to Help Make Good Decisions.
Even if you hire someone to soil-sample your fields, it’s still important to understand the basics behind the soil sampling procedure. Knowing this process can help you know what questions to ask or what to look for when hiring someone to take your soil samples.
When to sample soil
Soil sampling is most often done in the fall after harvest or in spring before field work, but it should always be done prior to applying fertilizer. It’s important to be consistent in the timing of soil sampling (either always in the fall or always in the spring). Samples should be taken every two to four years, or once in a crop rotation. Fields should be in the same crop each time when sampled to help reduce variability of test results.
Soil samples can be taken in the following manner:
Whole field sampling. Collect a small number of samples to represent the whole field. Not recommended for crop fields because you are not able to capture field variability.
Grid sampling. A field is broken into square grids (1.1- to 10-acre grids), with a sample representing a grid.
Management zone sampling. A field is separated into management zones for soil sampling based on a combination of prior experience, field history, soil survey maps, yield maps, topography, or other management or historic information.
Whatever method you decide to use, each sample should be a composite of a minimum of 10 to 15 cores. Also, it’s ideal that a sample should not represent more than about 10 acres, unless available information suggests larger field areas have little variation, such as in soil type or yield potential. Multiple sampling areas per field help determine if a uniform application rate, or a variable or site-specific application rate for fertilizer, manure or lime is more suitable.
Cores should be taken from a combination of locations — in the row, between the row, midway between the row — and not just in one small radius within the sampling area. This is especially important if fertilizer or manure was banded. Samples should represent the sample area or zone as completely as possible.
Importance of field history
Knowledge of the field’s history is important in choosing soil sample areas and understanding soil test results. Soil has a long memory, and past management can greatly influence what you see today. For instance, around old feedlots, it’s not uncommon to see high phosphorus and potassium levels. Why? When manure was hauled, it wasn't commonly hauled to the corners of the field but the area closest to the feedlot.
Technology has advanced to allow farmers to better understand field history via the internet. Google Earth and other internet mapping services let users look at satellite imagery back several decades. The Iowa State University Iowa Geographic Map Server allows users to search for historical aerial imagery as far back as the 1930s. This can offer insight into prior uses of current farm fields and may help explain differences found in some soil test results.
How to collect soil samples
Make sure that you have the needed materials:
plastic-lined soil sample bags
soil probe
bucket, preferably a plastic one, especially if testing for zinc
field map or GPS coordinates of soil sample areas
Having a general plan of attack prior to heading out to the field is helpful. This plan would include a map of areas to sample, an idea of how many samples to take, and a plan for how to collect the samples.
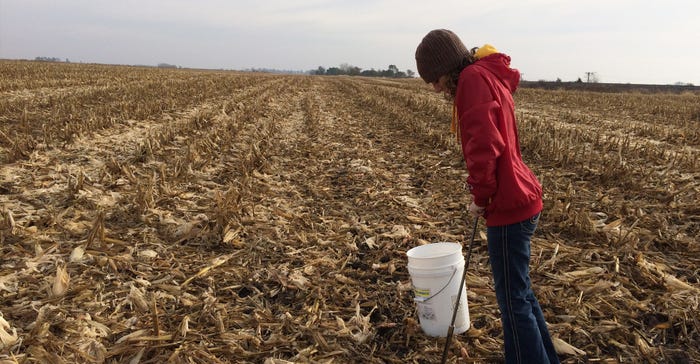
Within each sample area, pull 10 to 15 cores to make a composite sample. Since ISU Extension phosphorus and potassium fertilizer recommendations are based on a 6-inch sampling depth, pulling cores consistently at a 6-inch depth is important for calibration. Liming decisions are also made from these samples, but application rates should be adjusted for expected depth of incorporation.
As you sample, if a core pulls differently or does not look like the other cores in the area, discard that core and pull a different one.
What to test for
Fertilizer decisions will be based on the soil test results, particularly for phosphorus, potassium, and lime (pH and buffer pH). Additional tests can be completed but may add to the cost.
Typically, if you hire someone to soil sample your fields, they will send it to a lab they work closely with. Make sure the soil samples are being sent to a certified lab. Check and see if the lab your samples are submitted to is a certified lab for the state of Iowa. Go to the Iowa Department of Agriculture and Land Stewardship Commercial Feed & Fertilizer Bureau webpage and select Certified Soil Testing Laboratories on the right-hand side.
A certified lab will always report results in parts per million and not pounds per acre. Recently, some labs have started to use moist testing procedures for potassium, which improves assessment of crop-available potassium and prediction of yield response to fertilization; farmers may want to choose a lab that offers this moist analysis.
The Iowa Department of Ag and Land Stewardship lists certified soil testing laboratories on the commercial fertilizer page under soil testing.
Interpreting results
ISU Extension publication PM1688, A General Guide for Crop Nutrient and Limestone Recommendations in Iowa, is a useful resource for interpreting soil test results for Iowa soils. It provides nutrient application recommendations for phosphorus, potassium, zinc and lime, based on a 6-inch soil sampling depth.
Interpretations and recommendations are based on long-term and short-term field experiments across the state. If you have any questions on soil sampling don't hesitate to contact your local ISU Extension field agronomist.
Anderson and Vittetoe are ISU Extension field agronomists.
About the Author(s)
You May Also Like


