Corn silage harvest is right around the corner, and it will likely be sooner than later in places where it’s been exceptionally dry this summer.
Timing that harvest for the right moisture content is always key to getting a good crop in the bunk and fermenting.
“A lot of people still don’t have a handle around harvest timing,” says Guarav Goyal, Northeast agronomist for Dekalb who is based in Ithaca, N.Y. “For me, that's the most important, because you can try to fix some things afterward, but they are not going to fix the things 100% if you do the timing wrong.”
Chopping too wet will lead to potential storage issues and seepage that can reduce the amount of good nutrients for the cows. Chopping too dry will increase grain content, but the moisture will be much less, leading to bunk packing problems and potentially low starch digestibility.
Below are optimum dry matter percentages per storage method from Cornell Cooperative Extension:
Bunk silos and piles, 32% to 36%
Bags, 32% to 36%
Concrete uprights, 35% to 38%
Sealed uprights, 40% to 50%
Check the milk line
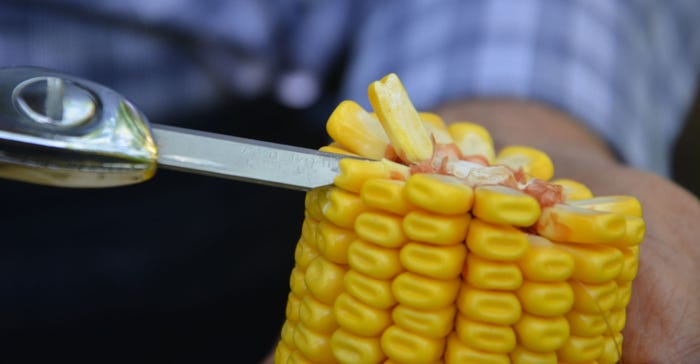
If you think your silage is close to being ready, pull off a cob, remove the top half of the ear and look at the kernels. Once early dent begins, a milk line will appear on the kernels and will advance down the kernel toward the cob.
If the milk line has progressed at least one-quarter down the kernel, that’s a good sign that moisture is around 70%, according to Goyal. After this, moisture levels usually decrease by 0.5 points a day, though that could be higher depending on weather conditions.
 GRAB AN EAR: Checking for corn silage moisture should start with checking an ear of corn. Pull off a cob, remove the top half of the ear and look at the kernels. Once early dent begins, a milk line will appear. If the milk line has progressed at least one-quarter down the kernel, that’s a good sign that moisture is around 70%.

“So if you’re at 70% and lose half a point a day, you’ll be at optimum moisture, 65%, in 10 days. That’s a good rule of thumb,” he says.
From there you can perform a full-plant moisture test using a microwave oven or Koster device. Penn State Extension has a video on how to perform either test. There are also portable moisture testing devices, including the SCiO Cup from Consumer Physics, although it’s pricey and includes a yearly subscription.
"For me, harvest timing is the most critical thing people can think about going into chopping. When you are chopping too dry because you can't get to a field quickly, the animals won't like to feed off it because it's too dry,” he says.
Anything above 70% and you’ll have seepage losses. Anything that’s too dry won’t pack well, leading to potentially too much oxygen in the bunk.
Chopper preparation
Of course, it’s crucial to have the chopper ready for harvest. Brad Wenger, sales and marketing manager for self-propelled forage harvesters at New Holland, says growers should make sure they do a good inspection of the knives, sharpening stones and blower paddles, and check that the moisture sensor and yield monitor are working properly before going out into the field.
Calibrations are also important to do, he says, and to also make sure that maps are preloaded into the monitor to quickly locate the field you’re pulling into.
Routine maintenance is also important, he says. Maybe a shaft seems loose on a bearing, or perhaps you should check that an animal hasn’t gotten into the wire harnesses. Getting ready is important, he says, because once harvest is started, mechanical downtime is not an option.
“Once that corn hits that moisture window, you really want to get it off and get it off quickly,” he says.
In general, it’s recommended that unprocessed corn be cut at 3/8 inch to 5/8 inch, while processed corn be cut at 3/8 inch to 3/4 inch.
Packing it properly
When it comes to packing, make sure you have the logistics worked out so you know who is packing the trenches and to not overwhelm them with material.
And make sure you have the proper weights. If you’re packing in a horizontal bunk, 6 mil plastic is recommended with tires on top.
“You don't want to leave wagons and trucks overnight. Get everything on that pile and complete that pile as fast as possible,” Wenger says.
Packing density is important, especially when chopping silage at different moisture levels. Goyal says that you want to make sure the driest material is packed at the bottom with the wet silage on top. This will put more pressure on the drier material and will allow moisture to leach down for fermentation to happen.
If the silage is too dry you can add water to moisten it up, but you need a lot of it — at least several hundred pounds of water — Goyal says, depending on dryness and tonnage.
If you’re going to use water, Penn State Extension recommends the fill rate of most silos be slowed due to slow water flows from most garden hoses and to ensure uniform water distribution.
You can also add liquid inoculant additives to promote aerobic stability, such as propionic acid and Lactobacillus buchneri, and to decrease mold growth.
Tips for next year
If you’re looking to upgrade equipment, the biggest thing to keep in mind is the technology already in use on the farm, according to Wenger.
Also, if you’re planning to change the chop length of your material, you’ll want to look at a different number of knives for the knife drum, he says, and think about the processor on the chopper and whether you want to upgrade that, too.
In terms of seed, Goyal says to look at tonnage and percentage of starch and fiber digestibility. This is used to calculate milk per acre and milk per ton. The higher the number, he says, the better.
“Think about what will work for your farm because each farm is different,” he says. “So, we have to really know your situation. What kind of soils you have? Is it dry? Is it clean soils? There is also early season emergence scores, which are crucial. Also, look at disease and stress ratings, and have good disease and stress tolerance.”
Read more about:
Corn SilageAbout the Author(s)
You May Also Like


