July 1, 2019

Sponsored Content
Tissue testing is an excellent tool for fine-tuning your nutrient management plans and helping to push yields to the next level. Tissue sampling should be done regularly to identify and track any deficiencies or imbalances, and it can also be used as a method for diagnosing problems within a field.
SAMPLING PROCEDURES
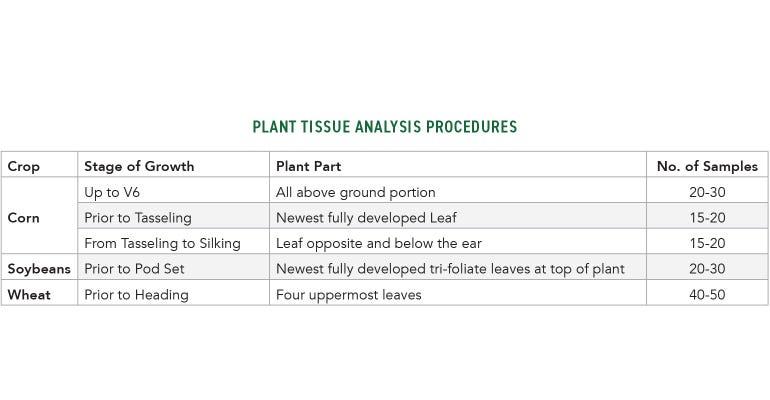
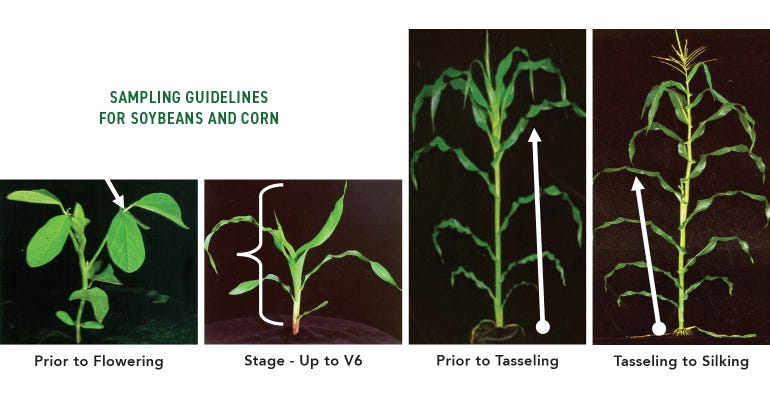
When pulling your very first tissue test that will become part of your routine testing regimen, or when trying to diagnose an issue in the field, be sure to pull a soil sample that is representative of the area being tested. A tissue test, in combination with a quality soil test, is an excellent way to draw conclusions from the data to make better decisions. One method is to pull a soil and tissue sample from both a high-yielding and low-yielding area of the field. Use the soil and tissue samples together to compare the differences between these areas. If conducting a regular, timely testing routine, be sure to pull samples from the same representative area of the field each time you sample. Below are some guidelines to follow when pulling samples, but always check with your lab for specific sampling instructions.
Handling and Shipping Samples
Place in a breathable paper bag
Send samples to a lab as quickly as possible
If sampling young plants, plants with soil on them, or samples from near a gravel road, rinse samples with distilled water and pat dry before shipping
Factors to Consider When Analyzing Results
Growth Stage: Some growth stages are more prone to show certain deficiencies.
Environmental Factors: Rainfall and extreme high or low temperatures can limit the uptake of nutrients, even if they are available within the soil.
Nutrient Deficiency: Be sure to look for root restrictions of the plant and soil test levels to determine whether there’s a true deficiency in the soil or if the plant has not developed an adequate root system to access the nutrients.
Hybrid/Variety: The product you plant can play a significant role in the metabolism of nutrients.
Keep Calm: Don’t overreact to one individual sample result. The goal of regular tissue testing is to establish your own on-farm database for your crop’s nutrient uptake pattern. At the end of the season, look at the trends, and then make adjustments for next year’s crop.
Consider Other Factors: Improving tissue test levels may not necessarily increase your yields as other factors may be yield-limiting. Always consult your trusted advisor with questions.
The charts below show typical plant sufficiency levels. Check with your local lab for details on how to interpret tissue test results.
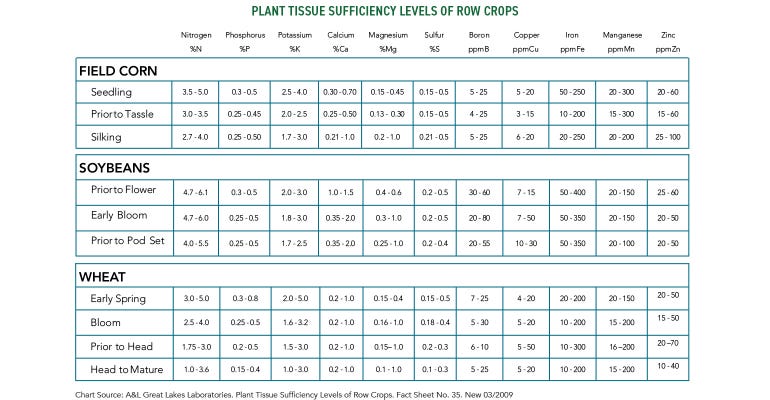
Tissue testing is a snapshot of what nutrients have been taken up by the plant at a particular time. Tissue tests should be interpreted along with a comprehensive soil testing program to identify the necessary management strategies. It is possible that a plant is deficient in a tissue test, but the soil test shows an adequate supply. In that case, applying a fertilizer would not remedy the problem and will only increase costs to the farmer. In that case, one should dig up plants to see if there are restrictions in the root system that prevent the plant from taking up the nutrients from the soil. Fallow syndrome, drought, compaction and other situations can also cause a disparity between tissue and soil tests.
Work with your local agronomist to interpret tissue tests and to make management decisions going forward.
About the Author(s)
You May Also Like


