November 23, 2020
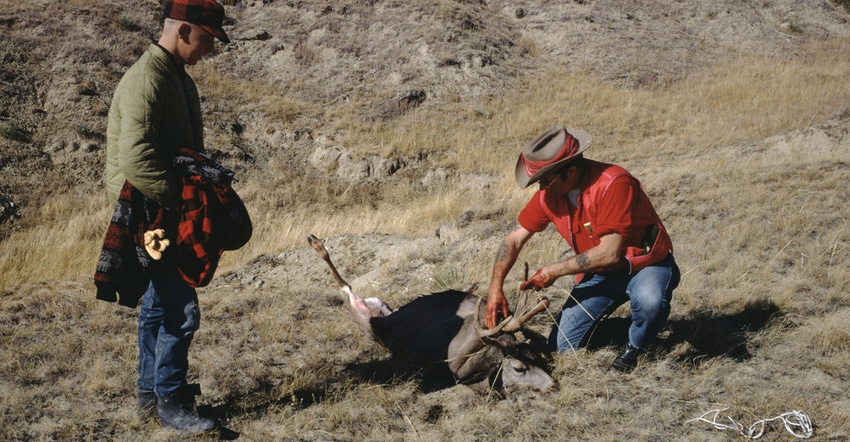
Properly field-dressing your game animal is an essential first step in preserving the meat and preventing the occurrence of disease-causing bacteria.
Techniques for field-dressing deer and other large animals depends on the size of the kill. While deer carcasses can be kept intact, elk and moose may require halving or quartering for transport out of the field and to accelerate cooling.
Here are some important tips to remember before you go out hunting:
Bring the proper tools. For proper field-dressing, bring the following items with you when you hunt:
sharp knife
small hatchet
whetstone or steel for sharpening
several feet of rope or nylon cord
rubber bands
some clean cloths or paper towels
resealable plastic storage bags
a large cooler full of ice or snow
ground pepper and cheesecloth
disposable plastic gloves
clean drinking water
Take a good shot. It is not necessary to bleed out an animal. In most cases, a well-placed bullet wound to the neck or torso — lungs, heart, liver — will be all that is needed to bleed the animal out.
Gut it quickly. There are several ways to field-dress an animal. Regardless of the technique, though, it’s important to eviscerate the animal as soon as possible after shooting. By dressing it quickly, you will ensure rapid loss of body heat, prevent surface bacteria from growing and improve the overall quality of the meat.
To reduce the risk of exposure to disease, wear plastic disposable gloves while handling animals. If you don't have gloves, wash your hands and arms thoroughly with soap and water before and after dressing.
With 6 to 8 feet of rope, tie one of the animal's legs to a tree to open the carcass for field-dressing. You can also spread the hind legs by propping a branch between them. Position the carcass on its back, using rocks or logs to keep it in place.
If you shoot a buck, remove the genitals from the carcass, leaving the scrotum for sex identification. If you shoot a doe, remove the udder from the carcass.
Practice "clean" field-dressing. Don’t leave a big hole in the abdominal area. By making a smaller incision, you'll prevent dirt, insects and other contamination from entering the carcass when dragging or carrying the animal.
Using a clean knife, cut along the midline from the bottom of the breastbone to a point near the scrotum or mammaries. Make the cut by lifting the skin and muscle together. The hip bone does not need to be sawed through to field-dress an animal.
Once you have a big enough incision, you can insert your whole hand in the opening just beneath the breastbone. Grasp the knife with the blade facing upward to avoid puncturing the intestines or entrails. Bacteria associated with foodborne illness may be found in these organs.
You also can insert two fingers — one on each side of the knife blade — into the slit next to the breastbone, pushing the intestines or entrails down and away from the knife.
Use clean water, premoistened wipes or alcohol swabs to clean your knife frequently between cuts to avoid dragging bacteria into the meat.
Cut around the anus — and vulva if a female — loosening it so it will come out with the rest of the intestines — and reproductive tract if field-dressing a female. You can tie off the anus or vulva with either rubber bands or string after placing a plastic bag over the anus or vulva. Doing so will prevent any feces from the rectum from contacting the carcass.
Pull the anus, large intestine and reproductive tract into the body cavity. At this point, you can roll the carcass over and remove the entrails. You may need to cut with your knife to loosen them from the inside of the body cavity.
Reach into the body cavity and cut the diaphragm free from the rib cage. You may have to remove the windpipe and esophagus or gullet by cutting as far forward in the chest cavity as possible. Or, you can reach through the diaphragm up into the neck and, working blindly, cut loose the windpipe and esophagus or gullet ahead of the lungs. Remove the heart, lungs, esophagus or gullet, and windpipe from the chest cavity.
Finish cleaning out the cavity by removing any remaining entrails and drain all excess blood. Remove all visible dirt, feces, hair and bloodshot areas. Wipe the inside of the body cavity with a dry cloth or paper towels.
If you choose to rinse the cavity with water to remove extraneous material, use clean water and dry it thoroughly. Do not rinse the deer in a pond or stream. Excess moisture will encourage bacterial growth that can affect the quality and safety of the meat. Propping the cavity open with sticks or branches will aid in air circulation and drying.
Chill the carcass. It’s important to dissipate the heat from the carcass as soon as possible. If the air temperature is above 40 degrees F, you can rapidly chill it by inserting resealable plastic bags of ice or snow into the body cavity and securing them in place by tying the cavity shut with small lengths of string. Tying the cavity shut also will prevent dirt, insects and other contamination from entering the carcass when you drag or carry the deer.
If you do not have snow or ice available, allow for adequate air circulation in the cavity and keep the carcass out of direct sunlight. Upon arrival at your home, camp or processor, refrigerate the carcass — lower than 40 degrees — as soon as possible to prevent spoilage and to improve the quality of the meat. Carcasses also may be hung and chilled outdoors if the temperature is below 40 degrees.
Watch for smells, discharge. If any of the internal organs smell offensive or exhibit greenish discharge, black blood or blood clots in the muscle, do not consume meat from the carcass. According to the Pennsylvania Game Commission, a hunter who legally kills a deer and discovers the flesh is unfit for consumption at the time of killing shall, within 12 hours following the discovery, deliver the entire carcass — less entrails but including the head and hide — to any Pennsylvania Game Commission officer.
At that time, the officer will decide that the deer is unfit for consumption and shall issue a written authorization to the person to kill a second deer during the remaining unexpired portion of hunting season.
To skin or not to skin. Once you have field-dressed your animal, you’ll have to consider whether to remove the hide.
There are several reasons for removing the hide immediately. First, you can maintain its integrity for taxidermy purposes, especially if it’s removed before transport. Second, you can chill the carcass faster by removing the hide, which may act as an insulator and keep in body heat.
Leaving the hide on the carcass also has advantages. If the deer is left outside for chilling, it can act as an insulator from the extreme cold; it can prevent contamination from bacteria, dust, leaves, insects and hair during transport; and it can prevent drying of the meat.
Leaving the hide on during aging — 32 to 38 degrees for two to three days —also will minimize shrinkage, keep the carcass clean and avoid discoloration of the meat.
Skinning tips. The main things to keep in mind when skinning are using the knife as little as possible, and pulling and fisting the hide, especially if you want to keep the meat surface and hide intact.
Using a clean knife, cut the skin over the rear of the hock and down the back of the leg toward the rectum. Skin around the hocks and remove the legs at the break joints just below the knees. Make an opening between the tendons and the hocks. Be careful not to cut the tendons, as you can use them later to hang your carcass.
Open the skin around the anus and skin along the midline of the carcass. Once the hide is loosened, you can begin to pull it over the rounds or haunches, over the loin and back, and over the shoulders. Use your fist to remove the hide from the sides, continuing to pull it down the back.
If you get some flesh or muscle with the hide, trim it off with your knife or fist it back into the carcass. Pull the hide completely from the carcass.
If you decide to save the hide, liberally rub the inside with fine salt and let it absorb for 24 to 48 hours. Ship or transport the hide to a taxidermist for tanning and mounting.
To remove the head, split the underside of the neck. Remove the head at the atlas joint — the connection between the head and the first vertebra of the neck and spinal column. Remove the esophagus or gullet and windpipe as well as any other remaining organs.
If desired, clean up the carcass with plenty of clean water and remove any extraneous material. Store the carcass under refrigerated conditions — below 40 degrees — until it is boned or processed.
Nettles Cutter is a professor and food safety Extension specialist with Penn State Cooperative Extension.
Source: Penn State Cooperative Extension, which is solely responsible for the information provided and is wholly owned by the source. Informa Business Media and all its subsidiaries are not responsible for any of the content contained in this information asset.
You May Also Like

